Many of our users have advanced knowledge of surveying software and supporting programs. But even if you don’t, you’ve likely had to do some sort of manual computer work with your drone images and data in the course of your job. So, Propeller is putting together a few how-to write-ups on our most popular data queries.
Today, we’ll be covering how you can batch geotag drone images with exiftool. This how-to is for users who are familiar with executing applications via the command line.
Download the exiftool conversion software
Before we jump in, make sure you have exiftool software installed on your computer. If you don’t, you can download it here.
Before you run the program, format your data
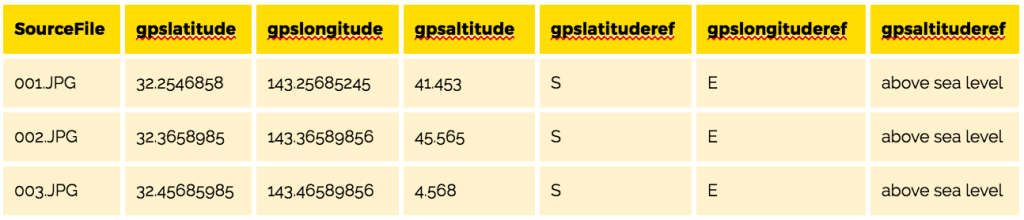
To begin this batch geotagging process, you need a file formatted with the same headings and information as the table below. Once that’s set up, save it as a CSV file. (Make sure your latitude and longitude have eight decimal places of precision. This allows your geotagged photos to be located accurately.)
In you CSV, name a column “SourceFile,” and include the names of the images and their file extension in that column.
Adding file names to the extension
Should file names not be included the extension, it’s easy to add yourself in a program like Excel. Here’s how:
- With your file names listed in column A, insert two new columns next to A with all the original file names.
- In column B, enter “.JPG” (if it’s a JPEG).
- In column C, enter “=CONCAT(A1, A2)”.
- Copy all of column C.
- Then “Paste Special” into column C, while selecting the Text Only option. This will rewrite the formulas in column C with the concatenated text.
- Once that’s finished, rename column C as “SourceFile”
- Then you can delete the original column A and column B.
- Save the file as a CSV, and you’re done.
What your final CSV file should look like
Once you’ve got your CSV file ready and have got that column named “SourceFile”, make sure the other columns have the same names as in the example below. The conversion software requires this specific formatting in order to match its command line arguments.
Run the command line program
Now that you have your CSV file formatting, you’re ready to run the program and batch geotag your images. To begin, the command line argument to run is:
exiftool -GPSLatitude -GPSLongitude -GPSAltitude -GPSLatitudeRef -GPSLongitudeRef -GPSAltitudeRef -csv=”path-to-the-csv.csv” -o output/ path-to-images/
Once that is run, you’re all set. But what exactly is happening with this complicated argument? Let’s unpack what a few elements actually mean.
- Each -GPS* flag in the line tells the software to read a column by the same name from your CSV file and to add that info to each image’s exiftool data.
- The “-o geotag_output” flag and argument creates a new directory named “geotag_output”. It then puts all the newly geotagged photos inside that directory, which preserves your original photographs.
If you’d like more info on the specifics of this process, the software provides help text while you run it.